一、前言
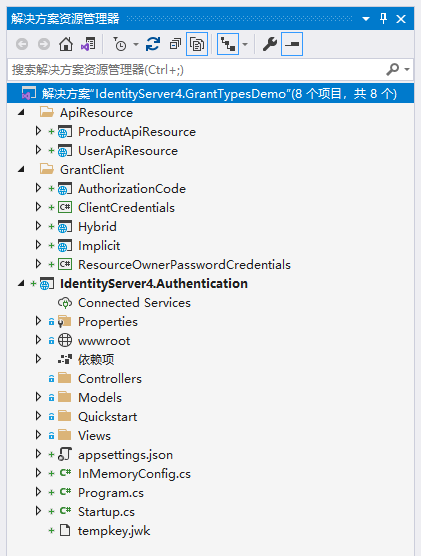
先交代一下整个Demo项目结构:
- 一个认证服务(端口5000)
IdentityServer4.Authentication - 五个授权模式(两个控制台程序,三个MVC项目端口5001)文件夹
GrantClient - 两个资源服务(WebApi:UserApiResource端口8000,ProductApiResource端口9000)文件夹
ApiResource
二、准备认证服务 + 资源服务
1、认证服务
(1)新建一个MVC项目,安装 IdentityServer4 ,注册五种授权模式客户端,代码如下
public class Startup { public Startup(IConfiguration configuration) { Configuration = configuration; } public IConfiguration Configuration { get; } // This method gets called by the runtime. Use this method to add services to the container. public void ConfigureServices(IServiceCollection services) { services.AddControllersWithViews(); services.AddIdentityServer() .AddDeveloperSigningCredential() //临时证书 .AddInMemoryClients(InMemoryConfig.GetClients()) //客户端模式,InMemory内存数据 .AddInMemoryApiScopes(InMemoryConfig.GetApiScopes()) //作用域 .AddInMemoryApiResources(InMemoryConfig.GetApiResources()) //资源 .AddTestUsers(InMemoryConfig.GetTestUser()) //用户 .AddInMemoryIdentityResources(InMemoryConfig.IdentityResources); } // This method gets called by the runtime. Use this method to configure the HTTP request pipeline. public void Configure(IApplicationBuilder app, IWebHostEnvironment env) { if (env.IsDevelopment()) { app.UseDeveloperExceptionPage(); } else { app.UseExceptionHandler("/Home/Error"); } app.UseIdentityServer(); //使用IdentityServer4 app.UseStaticFiles(); app.UseRouting(); app.UseAuthorization(); app.UseEndpoints(endpoints => { endpoints.MapControllerRoute( name: "default", pattern: "{controller=Home}/{action=Index}/{id?}"); }); } }public class InMemoryConfig { public static IEnumerable<IdentityResource> IdentityResources => new IdentityResource[] { new IdentityResources.OpenId(), new IdentityResources.Profile(), //new IdentityResources.Email(), //new IdentityResources.Address(), //new IdentityResources.Phone() }; /// <summary> /// ApiResource 资源列表 /// </summary> public static IEnumerable<ApiResource> GetApiResources() { return new[] { new ApiResource("UserApiResource", "获取用户信息API") { Scopes={ "UserScope" } }, new ApiResource("ProductApiResource", "获取商品信息API") { Scopes={ "ProductScope" } } }; } /// <summary> /// ApiScopes 作用域 /// </summary> public static IEnumerable<ApiScope> GetApiScopes() { return new ApiScope[] { new ApiScope("UserScope"), new ApiScope("ProductScope") }; } /// <summary> /// Client 客户端 /// </summary> public static IEnumerable<Client> GetClients() { return new[] { //客户端模式 new Client { ClientId = "ClientCredentials", ClientName = "ClientCredentials", ClientSecrets = new [] { new Secret("ClientCredentials".Sha256()) }, AllowedGrantTypes = GrantTypes.ClientCredentials, AllowedScopes = new [] { "UserScope" } }, //密码模式 new Client { ClientId = "ResourceOwnerPasswordCredentials", ClientName = "ResourceOwnerPasswordCredentials", ClientSecrets = new [] { new Secret("ResourceOwnerPasswordCredentials".Sha256()) }, AllowedGrantTypes = GrantTypes.ResourceOwnerPassword, AllowedScopes = new [] { "ProductScope", IdentityServerConstants.StandardScopes.OpenId, IdentityServerConstants.StandardScopes.Profile, } }, //简化模式 new Client { ClientId = "Implicit", ClientName = "Implicit", AllowedGrantTypes = GrantTypes.Implicit, RedirectUris = { "https://localhost:5001/signin-oidc" }, PostLogoutRedirectUris = { "https://localhost:5001/signout-callback-oidc" }, RequireConsent = true, AllowedScopes = new []{ "UserScope", "ProductScope", IdentityServerConstants.StandardScopes.OpenId, IdentityServerConstants.StandardScopes.Profile, } }, //授权码模式 new Client { ClientId = "AuthorizationCode", ClientName = "AuthorizationCode", ClientSecrets = new [] { new Secret("AuthorizationCode".Sha256()) }, AllowedGrantTypes = GrantTypes.Code, RedirectUris = { "https://localhost:5001/signin-oidc" }, PostLogoutRedirectUris = { "https://localhost:5001/signout-callback-oidc" }, RequireConsent = true, AllowedScopes = new []{ "UserScope", "ProductScope", IdentityServerConstants.StandardScopes.OpenId, IdentityServerConstants.StandardScopes.Profile, } }, //混合模式 new Client { ClientId = "Hybrid", ClientName = "Hybrid", ClientSecrets = new [] { new Secret("Hybrid".Sha256()) }, AllowedGrantTypes = GrantTypes.Hybrid, RedirectUris = { "https://localhost:5001/signin-oidc" }, PostLogoutRedirectUris = { "https://localhost:5001/signout-callback-oidc" }, RequireConsent = true, RequirePkce = false, AllowedScopes = new []{ "UserScope", "ProductScope", IdentityServerConstants.StandardScopes.OpenId, IdentityServerConstants.StandardScopes.Profile, //IdentityServerConstants.StandardScopes.Email, //IdentityServerConstants.StandardScopes.Address, //IdentityServerConstants.StandardScopes.Phone } }, }; } public static List<TestUser> GetTestUser() { return new List<TestUser>(){ new TestUser { SubjectId = "1", Username = "WinterSir", Password = "WinterSir", Claims = { new Claim(JwtClaimTypes.Name,"WinterSir"), new Claim(JwtClaimTypes.GivenName,"WinterSir"), new Claim(JwtClaimTypes.FamilyName,"WinterSir-FamilyName"), new Claim(JwtClaimTypes.Email,"641187567@qq.com"), new Claim(JwtClaimTypes.EmailVerified,"true", ClaimValueTypes.Boolean), new Claim(JwtClaimTypes.WebSite,"http://WinterSir.com"), new Claim(JwtClaimTypes.Address,@" [ 'street_address': 'Chang Ping', 'locality': 'BeiJing' ,'postal_code’: 102206,'country': 'China'}", IdentityServerConstants.ClaimValueTypes.Json) } } }; } }(2)cmddotnet new is4ui安装Quickstart UI模板,删除原来 Controllers 中 HomeController 防止冲突,设置5000端口启动
2、资源服务
新建两个WebApi项目,安装IdentityServer4.AccessTokenValidation,分别修改Startup、Controller,设置8000、9000端口启动
public class Startup { public Startup(IConfiguration configuration) { Configuration = configuration; } public IConfiguration Configuration { get; } // This method gets called by the runtime. Use this method to add services to the container. public void ConfigureServices(IServiceCollection services) { services.AddControllers(); services.AddSwaggerGen(c => { c.SwaggerDoc("v1", new OpenApiInfo { Title = "ProductApiResource", Version = "v1" }); }); //集成端口为5000的认证服务 services.AddAuthentication("Bearer") .AddIdentityServerAuthentication(options => { options.Authority = "https://localhost:5000"; options.ApiName = "ProductApiResource"; }); } // This method gets called by the runtime. Use this method to configure the HTTP request pipeline. public void Configure(IApplicationBuilder app, IWebHostEnvironment env) { if (env.IsDevelopment()) { app.UseDeveloperExceptionPage(); app.UseSwagger(); app.UseSwaggerUI(c => c.SwaggerEndpoint("/swagger/v1/swagger.json", "ProductApiResource v1")); } app.UseRouting(); app.UseAuthentication();//鉴权 app.UseAuthorization();//授权 app.UseEndpoints(endpoints => { endpoints.MapControllers(); }); } }
三、授权模式
1、客户端授权模式
客户端模式(Client Credentials)指客户端以自己的名义,而不是以用户的名义,向"认证服务"进行认证。如果是提前约束好的客户端,直接给你颁发令牌 token
安装IdentityModel
class Program { /// <summary> /// 客户端模式(Client Credentials) /// </summary> /// <param name="args"></param> static void Main(string[] args) { Console.WriteLine("***************** 客户端模式(Client Credentials)*****************"); var client = new HttpClient(); var disco = client.GetDiscoveryDocumentAsync("https://localhost:5000/").Result; if (disco.IsError) { Console.WriteLine(disco.Error); return; } var tokenResponse = client.RequestClientCredentialsTokenAsync(new ClientCredentialsTokenRequest { Address = disco.TokenEndpoint, ClientId = "ClientCredentials", ClientSecret = "ClientCredentials", Scope = "UserScope" }).Result; if (tokenResponse.IsError) { Console.WriteLine(tokenResponse.Error); return; } Console.WriteLine("\nToken: " + tokenResponse.AccessToken); var apiClient = new HttpClient(); apiClient.SetBearerToken(tokenResponse.AccessToken); var response = apiClient.GetAsync("https://localhost:8000/User/Get").Result; if (!response.IsSuccessStatusCode) { Console.WriteLine(response.StatusCode); } else { var content = response.Content.ReadAsStringAsync().Result; Console.WriteLine("\n结果: " + content); } Console.ReadLine(); } }
2、密码模式
密码模式(Resource Owner Password Credentials)中客户端使用用户提供的用户名和密码,向"认证服务"进行认证,有较高风险,通常只有在其他授权模式无法执行的情况下,才能考虑使用这种模式。相较于客户端多了一个用户角色。
安装IdentityModel
static void Main(string[] args) { Console.WriteLine("***************** 密码模式(Resource Owner Password credentials)***************** "); var client = new HttpClient(); var disco = client.GetDiscoveryDocumentAsync("https://localhost:5000/").Result; if (disco.IsError) { Console.WriteLine(disco.Error); return; } var tokenResponse = client.RequestPasswordTokenAsync(new PasswordTokenRequest() { Address = disco.TokenEndpoint, ClientId = "ResourceOwnerPasswordCredentials", ClientSecret = "ResourceOwnerPasswordCredentials", UserName = "WinterSir", Password = "WinterSir", Scope = "ProductScope", }).Result; if (tokenResponse.IsError) { Console.WriteLine(tokenResponse.Error); return; } Console.WriteLine("\nToken: " + tokenResponse.AccessToken); var apiClient = new HttpClient(); apiClient.SetBearerToken(tokenResponse.AccessToken); var response = apiClient.GetAsync("https://localhost:9000/Product/Get").Result; if (!response.IsSuccessStatusCode) { Console.WriteLine(response.StatusCode); } else { var content = response.Content.ReadAsStringAsync().Result; Console.WriteLine("\n结果: " + content); } Console.ReadLine(); }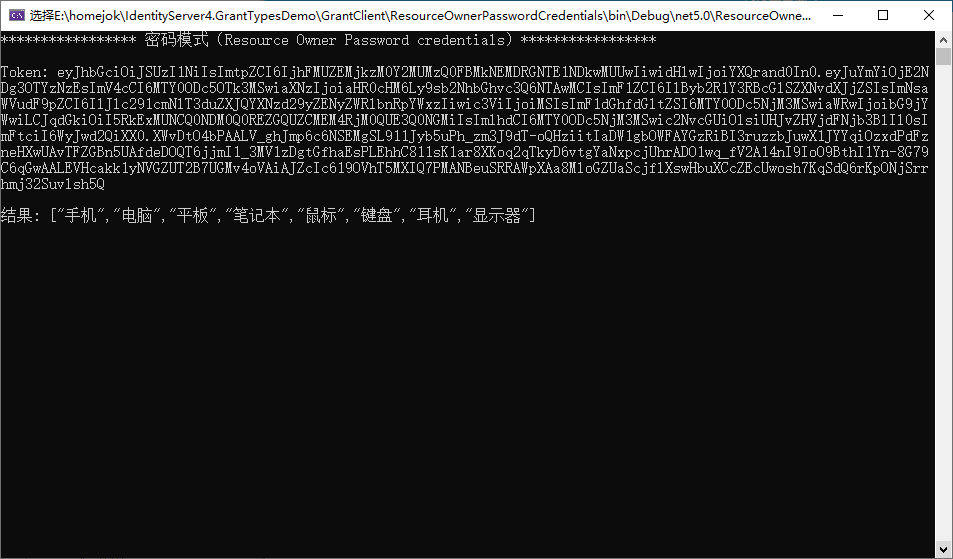
3、简化模式
简化模式(Implicit)比授权码模式少了code环节,所有步骤在浏览器中完成,令牌对访问者是可见的,且客户端不需要认证,该模式是很不安全的,且不支持refresh token,适用于 Web 安全要求不高的场景,设置较短时效的 token。
(1)安装IdentityServer4.AccessTokenValidation、Microsoft.AspNetCore.Authentication.OpenIdConnect,修改Startup
public class Startup { public Startup(IConfiguration configuration) { Configuration = configuration; } public IConfiguration Configuration { get; } // This method gets called by the runtime. Use this method to add services to the container. public void ConfigureServices(IServiceCollection services) { //关闭Jwt映射 JwtSecurityTokenHandler.DefaultMapInboundClaims = false; //注册授权 services.AddAuthentication(options => { options.DefaultScheme = "Cookies"; options.DefaultChallengeScheme = "oidc"; }) .AddCookie("Cookies") .AddOpenIdConnect("oidc", options => { options.Authority = "https://localhost:5000"; //认证服务 options.RequireHttpsMetadata = true; //必须使用Https,否则用户无法登录 options.ClientId = "Implicit"; options.ClientSecret = "Implicit"; options.SaveTokens = true; //表示Token要存储 }); services.AddControllersWithViews().AddRazorRuntimeCompilation(); } // This method gets called by the runtime. Use this method to configure the HTTP request pipeline. public void Configure(IApplicationBuilder app, IWebHostEnvironment env) { if (env.IsDevelopment()) { app.UseDeveloperExceptionPage(); } else { app.UseExceptionHandler("/Home/Error"); } app.UseStaticFiles(); app.UseRouting(); app.UseAuthentication(); app.UseAuthorization(); app.UseHttpsRedirection(); app.UseEndpoints(endpoints => { endpoints.MapControllerRoute( name: "default", pattern: "{controller=Home}/{action=Index}/{id?}"); }); } }(2)_Layout.cshtml添加 注销按钮
<div class="navbar-collapse collapse d-sm-inline-flex justify-content-between"> <ul class="navbar-nav flex-grow-1"> <li class="nav-item"> <a class="nav-link text-dark" asp-area="" asp-controller="Home" asp-action="Index">Home</a> </li> <li class="nav-item"> <a class="nav-link text-dark" asp-area="" asp-controller="Home" asp-action="Privacy">Privacy</a> </li> </ul> <a class="nav-link text-dark float-right" asp-area="" asp-controller="Home" asp-action="Logout">Logout</a> </div>(3)HomeController添加对应功能,需要认证的方法加上特性[Authorize]
[Authorize] public IActionResult Privacy() { return View(); } //注销 public IActionResult Logout() { return SignOut("Cookies", "oidc"); }(4)修改Privacy.cshtml
@{ ViewData["Title"] = "Privacy Policy"; } <h1>@ViewData["Title"]</h1> @using Microsoft.AspNetCore.Authentication <h2>Claims</h2> <dl> @foreach (var claim in User.Claims) { <dt>@claim.Type</dt> <dd>@claim.Value</dd> } </dl> <h2>Properties</h2> <dl> @foreach (var prop in (await Context.AuthenticateAsync()).Properties.Items) { <dt>@prop.Key</dt> <dd>@prop.Value</dd> } </dl>(5)效果图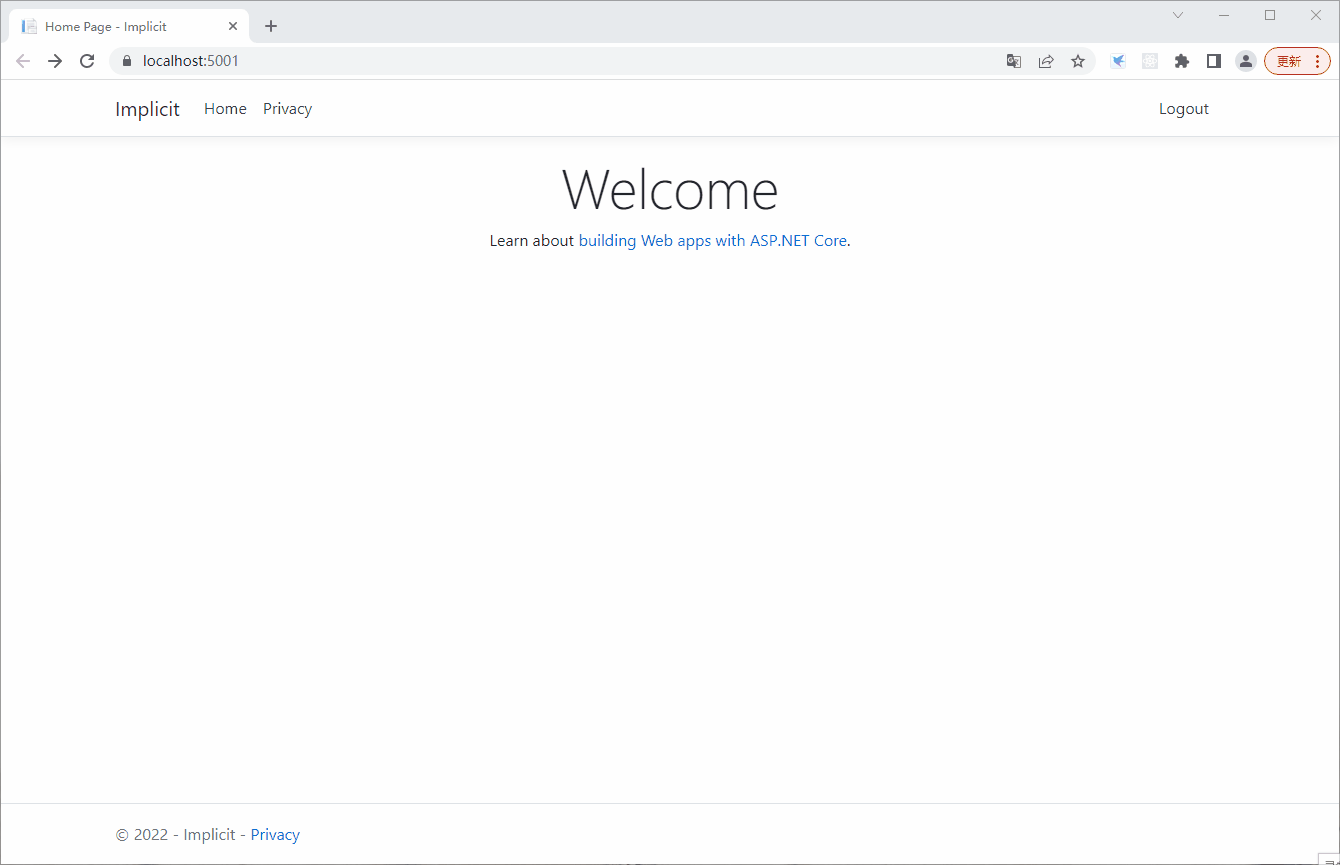
4、授权码模式
授权码模式(Authorization Code)不同于简化模式直接返回token,而是先返回一个授权码,再用授权码去请求token,然后携带访问Api资源。授权码模式是功能最完整、流程最严密的授权模式。
(1)安装IdentityServer4.AccessTokenValidation、Microsoft.AspNetCore.Authentication.OpenIdConnect,修改Startup
public class Startup { public Startup(IConfiguration configuration) { Configuration = configuration; } public IConfiguration Configuration { get; } // This method gets called by the runtime. Use this method to add services to the container. public void ConfigureServices(IServiceCollection services) { //关闭Jwt映射 JwtSecurityTokenHandler.DefaultMapInboundClaims = false; //注册授权 services.AddAuthentication(options => { options.DefaultScheme = "Cookies"; options.DefaultChallengeScheme = "oidc"; }) .AddCookie("Cookies") .AddOpenIdConnect("oidc", options => { options.Authority = "https://localhost:5000"; //认证服务 options.RequireHttpsMetadata = true; //必须使用Https,否则用户无法登录 options.ClientId = "AuthorizationCode"; options.ClientSecret = "AuthorizationCode"; options.ResponseType = "code"; options.Scope.Clear(); options.Scope.Add("UserScope"); options.Scope.Add("ProductScope"); options.Scope.Add(OidcConstants.StandardScopes.OpenId); options.Scope.Add(OidcConstants.StandardScopes.Profile); //options.Scope.Add(OidcConstants.StandardScopes.Email); //options.Scope.Add(OidcConstants.StandardScopes.Phone); //options.Scope.Add(OidcConstants.StandardScopes.Address); options.SaveTokens = true; //表示Token要存储 }); services.AddControllersWithViews().AddRazorRuntimeCompilation(); services.AddControllers().AddJsonOptions(options => { options.JsonSerializerOptions.Encoder = JavaScriptEncoder.Create(UnicodeRanges.All); }); } // This method gets called by the runtime. Use this method to configure the HTTP request pipeline. public void Configure(IApplicationBuilder app, IWebHostEnvironment env) { if (env.IsDevelopment()) { app.UseDeveloperExceptionPage(); } else { app.UseExceptionHandler("/Home/Error"); } app.UseStaticFiles(); app.UseRouting(); app.UseAuthentication(); app.UseAuthorization(); app.UseHttpsRedirection(); app.UseEndpoints(endpoints => { endpoints.MapControllerRoute( name: "default", pattern: "{controller=Home}/{action=Index}/{id?}"); }); } }(2)_Layout.cshtml添加 获取用户按钮、注销按钮
<div class="navbar-collapse collapse d-sm-inline-flex justify-content-between"> <ul class="navbar-nav flex-grow-1"> <li class="nav-item"> <a class="nav-link text-dark" asp-area="" asp-controller="Home" asp-action="Index">Home</a> </li> <li class="nav-item"> <a class="nav-link text-dark" asp-area="" asp-controller="Home" asp-action="Privacy">Privacy</a> </li> <li class="nav-item"> <a class="nav-link text-dark" asp-area="" asp-controller="Home" asp-action="User">UserApi</a> </li> </ul> <a class="nav-link text-dark float-right" asp-area="" asp-controller="Home" asp-action="Logout">Logout</a> </div>(3)HomeController添加对应功能,需要认证的方法加上特性[Authorize]
[Authorize] public IActionResult Privacy() { return View(); } [Authorize] public async Task<IActionResult> User() { var client = new HttpClient(); var accessToken = await HttpContext.GetTokenAsync(OpenIdConnectParameterNames.AccessToken); if (string.IsNullOrEmpty(accessToken)) { return Json(new { msg = "accesstoken 获取失败" }); } client.DefaultRequestHeaders.Authorization = new AuthenticationHeaderValue("Bearer", accessToken); var httpResponse = await client.GetAsync("https://localhost:8000/User/Get"); var result = await httpResponse.Content.ReadAsStringAsync(); if (!httpResponse.IsSuccessStatusCode) { ViewBag.Result = new { msg = "请求 User/Get 失败", error = result }; } ViewBag.Result = new { msg = "成功", data = result }; return View(); } //注销 public IActionResult Logout() { return SignOut("Cookies", "oidc"); }(4)修改Privacy.cshtml
@{ ViewData["Title"] = "Privacy Policy"; } <h1>@ViewData["Title"]</h1> @using Microsoft.AspNetCore.Authentication <h2>Claims</h2> <dl> @foreach (var claim in User.Claims) { <dt>@claim.Type</dt> <dd>@claim.Value</dd> } </dl> <h2>Properties</h2> <dl> @foreach (var prop in (await Context.AuthenticateAsync()).Properties.Items) { <dt>@prop.Key</dt> <dd>@prop.Value</dd> } </dl>(5)效果图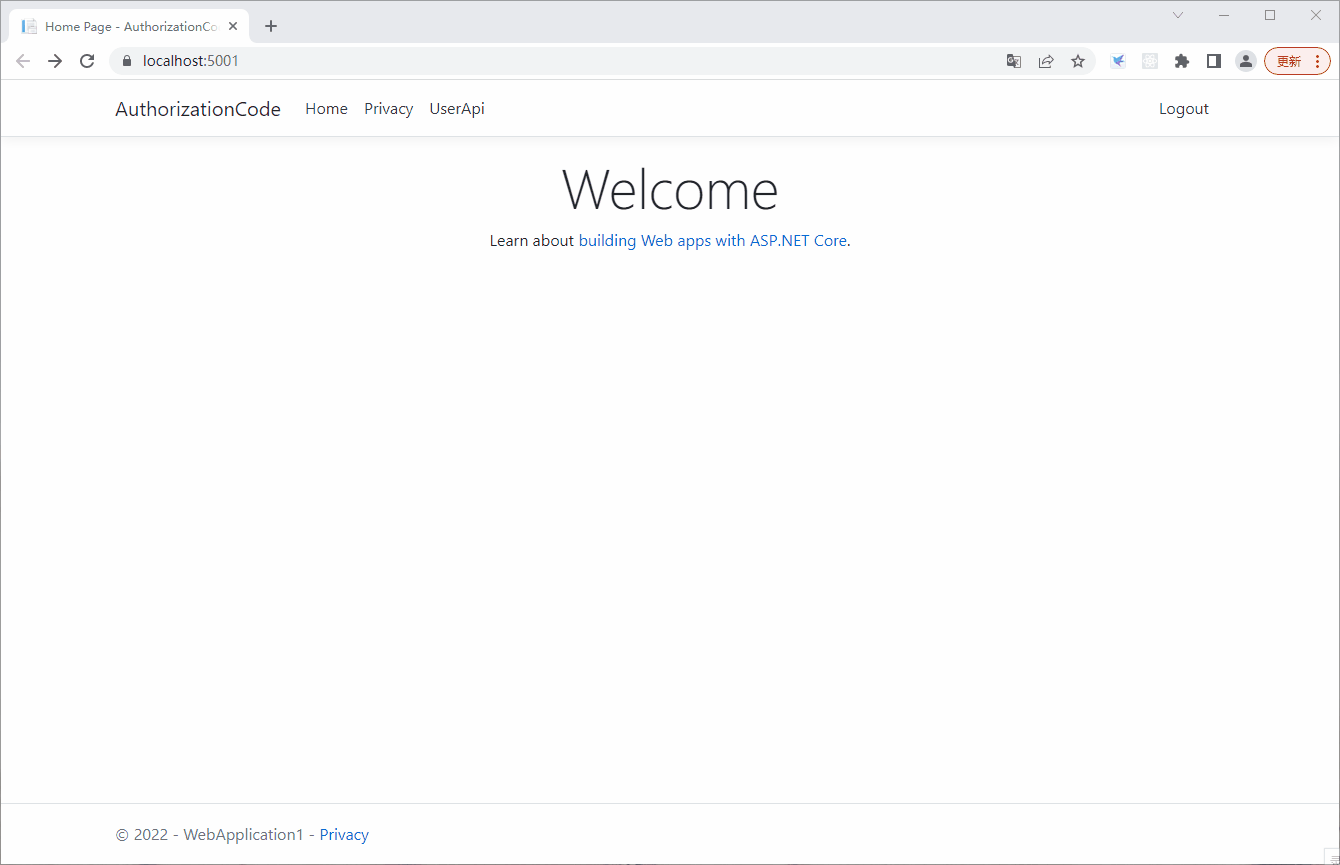
5、混合模式
混合模式(Hybrid Flow)
它为我们提供了两全其美的优势,身份令牌通过浏览器传输,因此客户端可以在进行任何更多工作之前对其进行验证。如果验证成功,客户端会通过令牌服务的以获取访问令牌
(1)安装IdentityServer4.AccessTokenValidation、Microsoft.AspNetCore.Authentication.OpenIdConnect,修改Startup
public class Startup { public Startup(IConfiguration configuration) { Configuration = configuration; } public IConfiguration Configuration { get; } // This method gets called by the runtime. Use this method to add services to the container. public void ConfigureServices(IServiceCollection services) { //关闭Jwt映射 JwtSecurityTokenHandler.DefaultMapInboundClaims = false; //注册授权 services.AddAuthentication(options => { options.DefaultScheme = "Cookies"; options.DefaultChallengeScheme = "oidc"; }) .AddCookie("Cookies") .AddOpenIdConnect("oidc", options => { options.Authority = "https://localhost:5000"; //认证服务 options.RequireHttpsMetadata = true; //必须使用Https,否则用户无法登录 options.ClientId = "Hybrid"; options.ClientSecret = "Hybrid"; options.ResponseType = "code id_token"; options.Scope.Clear(); options.Scope.Add("UserScope"); options.Scope.Add("ProductScope"); options.Scope.Add(OidcConstants.StandardScopes.OpenId); options.Scope.Add(OidcConstants.StandardScopes.Profile); //options.Scope.Add(OidcConstants.StandardScopes.Email); //options.Scope.Add(OidcConstants.StandardScopes.Phone); //options.Scope.Add(OidcConstants.StandardScopes.Address); //options.Scope.Add(OidcConstants.StandardScopes.0fflineAccess);//获取到刷新Token options.SaveTokens = true; //表示Token要存储 }); services.AddControllersWithViews().AddRazorRuntimeCompilation(); } // This method gets called by the runtime. Use this method to configure the HTTP request pipeline. public void Configure(IApplicationBuilder app, IWebHostEnvironment env) { if (env.IsDevelopment()) { app.UseDeveloperExceptionPage(); } else { app.UseExceptionHandler("/Home/Error"); } app.UseStaticFiles(); app.UseRouting(); app.UseAuthentication(); app.UseAuthorization(); app.UseHttpsRedirection(); app.UseEndpoints(endpoints => { endpoints.MapControllerRoute( name: "default", pattern: "{controller=Home}/{action=Index}/{id?}"); }); } }(2)_Layout.cshtml添加 获取产品、注销按钮
<div class="navbar-collapse collapse d-sm-inline-flex justify-content-between"> <ul class="navbar-nav flex-grow-1"> <li class="nav-item"> <a class="nav-link text-dark" asp-area="" asp-controller="Home" asp-action="Index">Home</a> </li> <li class="nav-item"> <a class="nav-link text-dark" asp-area="" asp-controller="Home" asp-action="Privacy">Privacy</a> </li> <li class="nav-item"> <a class="nav-link text-dark" asp-area="" asp-controller="Home" asp-action="Product">ProductApi</a> </li> </ul> <a class="nav-link text-dark float-right" asp-area="" asp-controller="Home" asp-action="Logout">Logout</a> </div>(3)HomeController添加对应功能,需要认证的方法加上特性[Authorize]
[Authorize] public IActionResult Privacy() { return View(); } [Authorize] public async Task<IActionResult> Product() { var client = new HttpClient(); var accessToken = await HttpContext.GetTokenAsync(OpenIdConnectParameterNames.AccessToken); if (string.IsNullOrEmpty(accessToken)) { return Json(new { msg = "accesstoken 获取失败" }); } client.DefaultRequestHeaders.Authorization = new AuthenticationHeaderValue("Bearer", accessToken); var httpResponse = await client.GetAsync("https://localhost:9000/Product/Get"); var result = await httpResponse.Content.ReadAsStringAsync(); if (!httpResponse.IsSuccessStatusCode) { ViewBag.Result = new { msg = "请求 User/Get 失败", error = result }; } ViewBag.Result = new { msg = "成功", data = result }; return View(); } //注销 public IActionResult Logout() { return SignOut("Cookies", "oidc"); }(4)修改Privacy.cshtml
@{ ViewData["Title"] = "Privacy Policy"; } <h1>@ViewData["Title"]</h1> @using Microsoft.AspNetCore.Authentication <h2>Claims</h2> <dl> @foreach (var claim in User.Claims) { <dt>@claim.Type</dt> <dd>@claim.Value</dd> } </dl> <h2>Properties</h2> <dl> @foreach (var prop in (await Context.AuthenticateAsync()).Properties.Items) { <dt>@prop.Key</dt> <dd>@prop.Value</dd> } </dl>(5)效果图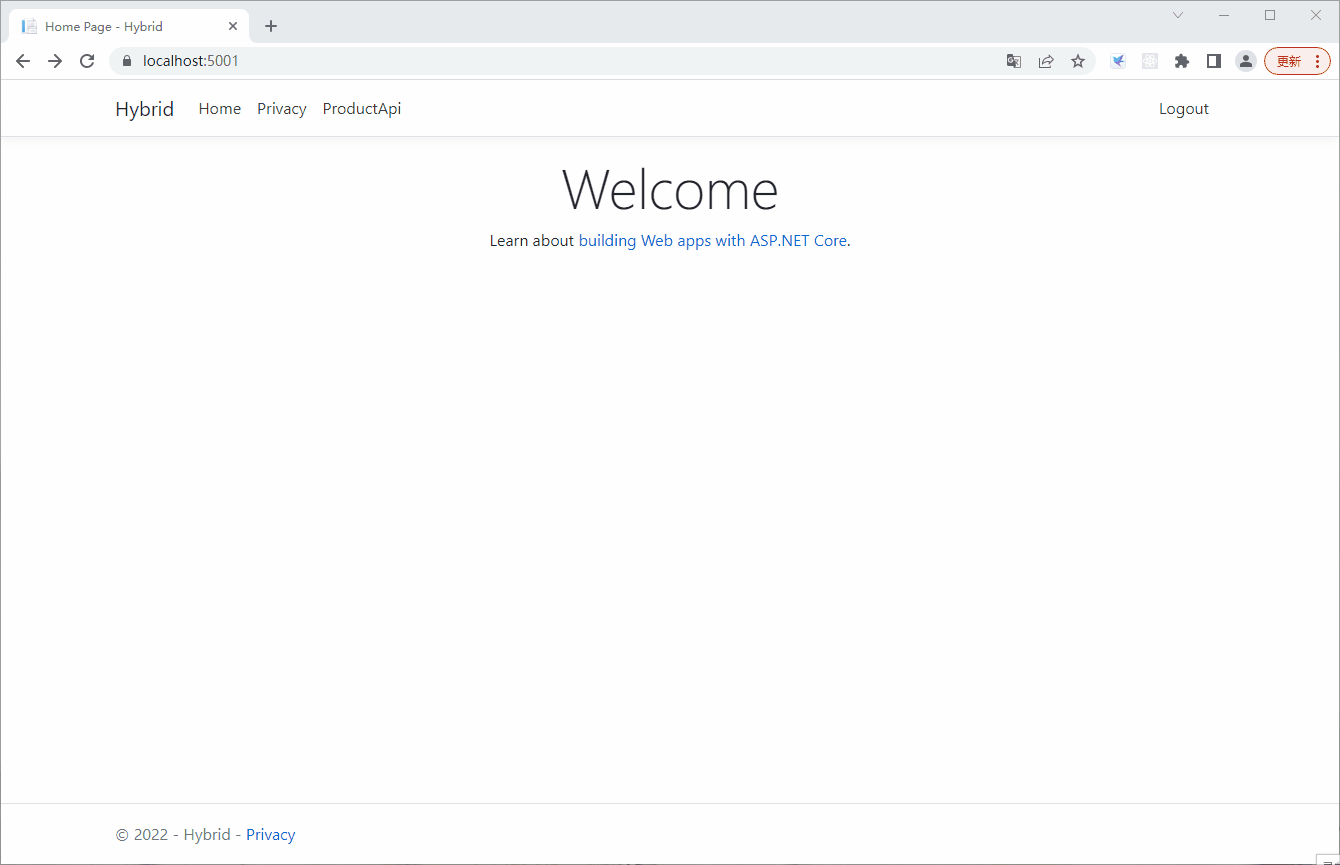
四、问题踩坑
1、Https
Demo全部用的Https,Mvc客户端配置RequireHttpsMetadata = true如果使用http遇到认证服无法务登录问题,可参考以下地址
https://www.cnblogs.com/i3yuan/p/14033016.html#autoid-20-0-0
2、ResponseType
授权码模式、混合模式需要修改客户端配置ResponseType,ResponseType = "code" 、 ResponseType = "code id_token"
3、RequirePkce
混合模式需要修改对应服务端注册客户端时配置RequirePkce = false,这样不需要客户端提供code challeng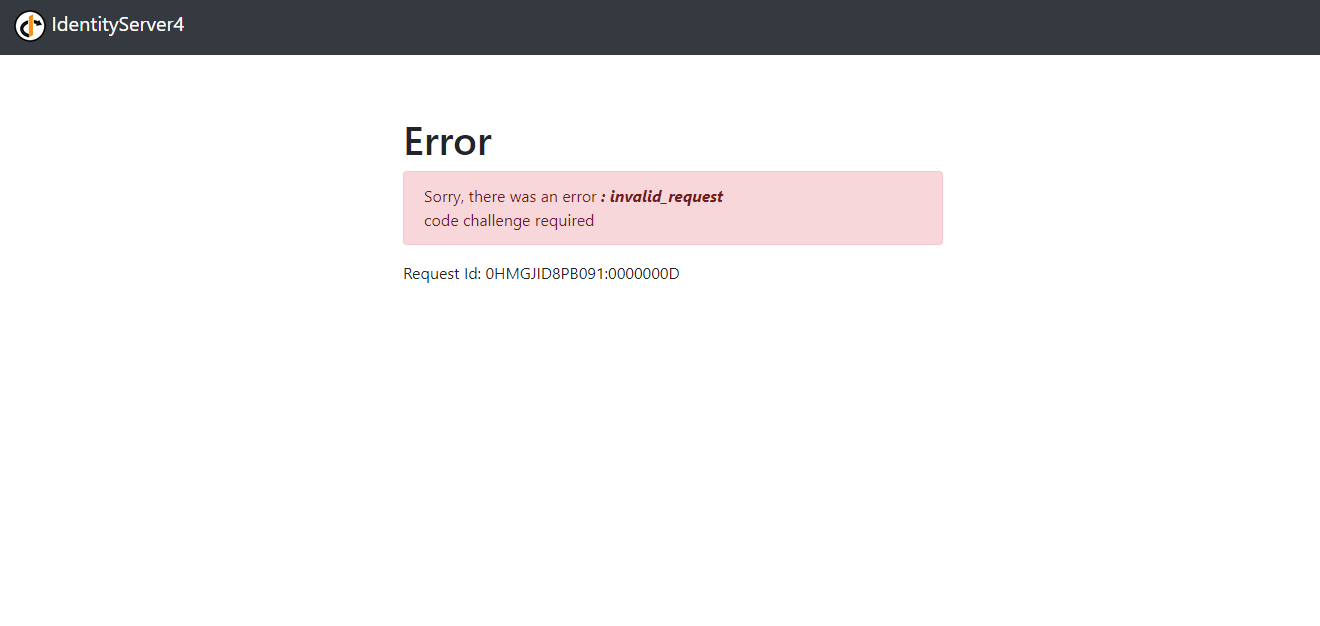
4、其他Error
出现错误大概率是客户端、服务端配置项问题,仔细对比一下就OK了
五、前人栽树,后人乘凉
https://www.cnblogs.com/i3yuan/category/1777690.html